Showing posts with label Burda. Show all posts

Saturday, March 12, 2011

Pleated Dress Fail

Again I am posting another dress disaster partially based on a pattern from Burdastyle. I know it seems like there is a trend here regarding Burda patterns, but in their defense I'm not very good with following instructions and have been known to have an unusual amount of bad luck when it comes to sewing. Anyways, when you look at the other people who post their projects on their website you have to wonder. Okay, so I did have the Anda dress disaster followed by the Fruit Salad dress disaster and now here is my pleated dress disaster, but I did have some success with other things I made from Burdastyle patterns. Like:

My cherry blossom skirt based on the Oliver and S lazy skirt pattern posted on Burdastyle.


And there is the Rainbow Reversible bag I made based on Novita from Verypurpleperson's free reversible bag pattern that is also on Burdastyle. 


And lastly my reversible Hawaiian fabric version of the Little Orange bag from the Pink Cornelia's free pattern on Burdastyle.


Okay so all these patterns weren't written by Burda, but that is beyond the point. I vow to one day make something succesfully from a Burda pattern. Anyways, my latest fail was from a free bodice pattern made by JJ that is available on Burdastyle. This pattern shouldn't mixed up with the JJ blouse pattern made by Burdastyle. The pattern was a bodice block developed and graded based on the Burda sizing chart by the Burdastyle reader JJ (author). I thought I could easily use this bodice pattern and attach a long gathered rectangle to make a dress like this one that IRO IRO made.


Dress Made By IROIRO

I thought I was being so careful when I made the bodice. I even tried it on and had my mom pin fit to me to make sure it fit. Everything was fine until I tried on the semi-finished version and found that the bodice was way to big for me. The bodice was so big that it was gaping in the front and back. Arrrgghh!! I don't know how the bodice ended up so big, but it did. Sadly the skirt was already attached so I really couldn't make anymore adjustments without messing with the skirt. So disappointing.


Side View


Front View


Instead of doing a gathered skirt as I originally planned I thought I would try to make a pleated skirt. I looked through the internet for some tutorials and best one gave me a ratio of 3:1 for making pleats. The 3:1 means that for every three inches of fabric when folded would yield a one inch pleat. I measured my rectangle pieces and found I can make six pleats to get the skirt to fit onto the bottom of the bodice.. I lined up the first pleat on each side with the front darts and back darts. I also decided to sew down the pleats to keep them from looking full. I top stitched my pleats, but after looking at it again I should have done it some more, but I wanted to fit into the skirt portion of the dress so I just left it alone. Pattern also didn't have any pieces for facings or where to attach a zipper so beware. I drew my own facings and added the zipper to the center back. Here is the final product.


Back View


Back View Detail


I don't think that the picture can really show the detailing of the pleats. Anyways, here is my pattern review:

Pattern Review (The Pros): The bodice is a Burdastyle reader made bodice pattern based on the standard Burda. The pattern is available as a free download for Burdastyle members (you can sign up for free online).

The Cons: I chose a size 44 based on the Burdastyle sizing and it cam out huge. I don't know if there was a mistake when I cut it out or what, but it ended up huge. Despite doing a fitting to make sure it fit.
Did it come out like the pattern picture? Yes.

Do you need to make adjustments? No, I cut out a straight size 44.

Pattern Level: Experienced Novice. This pattern is for a bodice piece with four darts in the front and two back darts. The pattern offers no directions on where to add a zipper. I decided to put my zipper in the center back so I added 5/8 to the center to accommodate the zipper. I'm sure this bodice was meant to have a side zipper, but I find doing a center zipper was easier for me.

What could I have done better? To do more than one fitting for the bodice. Measure twice and try it one twice before you add the skirt piece.
Would you sew this pattern again? No, probably not. 
NOTE: Here is a warning about adding pleats. You need to make sure your hem is equal and finished before you do the pleats because trying to finish the hem after you put on the pleats is a b**ch! I made the mistake of hemming the edge after putting on the pleats and my skirt kept getting shorter and still remained uneven. My mom finally suggested I measure all around with a measuring tape instead trying to eyeball it. This worked out, but I ended up cutting five inches off the hem before finally figuring it out.

Pattern: Bodice Block made from JJ from Burdastyle Reader Made Patterns.
Fabric: 100% cotton shirting from Fabric.com. 
Techniques: Facings, darts, pleats and bias tape.


The Fruit Salad Dress Disaster

I received my shipment of fabric from Fabric.com recently and was really eager to get started on a sewing project. I was lucky enough to shop their $1.98 clearance sale with an additional 20% discount plus free shipping with a $35 order. Phew! A very good deal. Anyways, I was feeling very confidant so I thought why not tackle a sewing project with sleeves since I haven't done that before and I'm pretty confidant with my zipper insertion so why not try something new. There was the mini disaster with the sleeves when I made my shift dress, but I learned my lesson.

Some time back I joined the Burdastyle community and purchased some online patterns from there. This was the first time I ever used an online pattern. Okay I'm lying I did use an online pattern from Burdastyle during the Anda Dress disaster of 2010, which I barely recovered from. Incident almost put me off sewing forever. Lets move on. Online patterns are a little different from traditional patterns in that you have print up each section of the pattern separately and put them together like a giant puzzle piece and re-cut it. Not to mention you need to make sure your scale is correct by measuring the little square that is printed on one of the pages to make sure you have the correct scale. Very tedious. Anyways, I chose the wedding dress pattern that I previously bought awhile back since it looked easy. Just an A-line shift with bell sleeves.


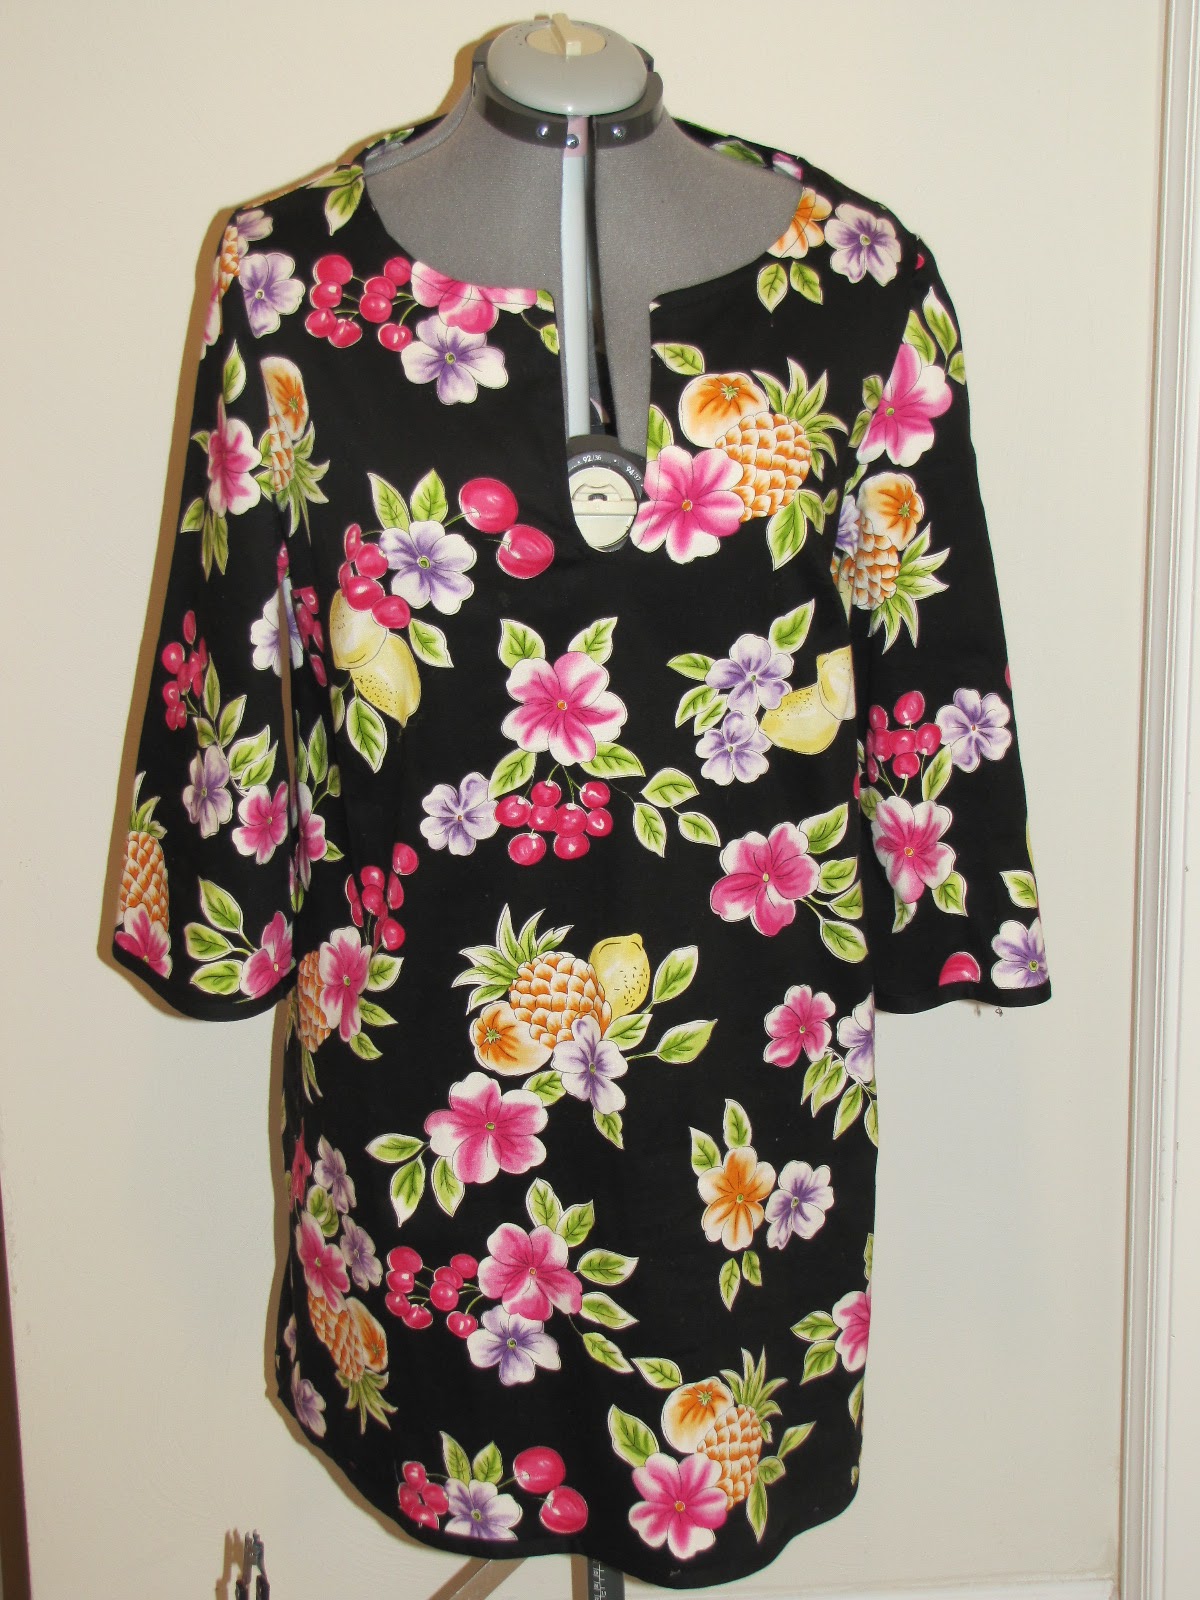
The dress was meant for a wedding dress, which I never got to see since its from the Burdastyle magazine and I don't own any. The dress was suppose to have a lace over lay on it. I decided to just make the dress using a black cotton twill with a little bit stretch printed with fruit that I purchased from the Fabric.com sale. That was mistake #1.

Front View

Neckline Detail

Mistake #2 didn't rear its ugly head until I finished dress. I am very conscious about dress sizing. Nothing is worse than putting in hours of work on something that ends up being too small for you. The same goes for sleeves. At my skinniest I had very muscular arms and always had a hard time buying shirts with sleeves, especially short sleeves because the band at the end of the sleeve was always too tight. My arm looked like an overstuffed turkey leg.

Back View


French Seam Detail

My arm sizing issues in ready to wear clothes was another reason I wanted to learn how to sew sleeves so that I can make clothing with short sleeves that I can wear. My mini-trauma over sleeve sizing made me too conservative in choosing a sizing for the dress. I chose to make the biggest size for the dress, which was a European size 46 thinking that the sleeve would fit me and not end up looking like the Imelda Marcos sleeve disaster. Great thing is that the sleeve fit perfectly. Bad thing was that the dress was big. The shoulder seam was 2-3 inches past my actual shoulder joint making me look like I had extremely broad shoulders. I also messed up when I was taping my pattern pieces together and the back neckline was big. You can't notice it because of my hair, but its still kind of ugly. A long list of mistakes.

And the biggest mistake of all was my choice of fabric. I thought that I could overcome the whole don't use a fabric with big print if you're petite because it will overwhelm you, but I was wrong. If this dress had short sleeves I might've gotten away with it, but with sleeves and jewel neckline I looked very humpty dumpty. I looked like I got swallowed by a fruit patterned table cloth. Boo! I couldn't be seen outside in the dress. Although I loved the sleeves that didn't make up for the tablecloth like pattern that was on the fabric. Why? How could I not see this? 

I did the only thing I could do. I ran to my mom for help. Of course mom had no sympathy at first admonishing me for choosing such a large print, when she had warned against it. After a while she felt bad for me and suggested that I either shorten the sleeves or cut a slit down the front, use a belt and wear it as a tunic. "LIGHT BULB!" My dress was suddenly salvageable. I cut a slit from the center of the front neck line to a few inches down, drew up some facings (pattern wanted to use bias tape, but I think facings look neater on the neckline) and stitched them on. Had a bit of trouble with finishing the facing at the bottom of the slit, but mom helped out.

So here is the final product. Not my best work, but at least it's wearable. Already wore it out with a belt and  jeans and leggings a couple times.


Here is my pattern review:

Pattern Review (The Pros): This is a Burdastyle magazine pattern for a wedding dress. The dress was very easy to make. Just three main pieces total: front and back dress bodice and a bell sleeve. No zippers and just two front darts finish off the dress. The bell sleeves are beautiful and the A-line shape is flattering.

The Cons: This dress is big. The dress is a pull-over style dress so that is probably the reason why it is large. I suggest cutting your size based on the Burdastyle pattern sizing and be prepared to baste the sides and adjust as needed if you want a more fitted look. Also the printed pattern pieces around the back neckline don't fit perfectly when you line up the triangles. My suggestion is to ignore the triangles and just line it up based on the cutting lines of the pattern. The last con is that the instructions are useless. Burdas patterns have been known to have limited pattern instructions so be warned. Also the seam allowance is 3/8" instead of the standard 5/8".

Did it come out like the pattern picture? Yes it did with the exception of the front slit that makes it look like a tunic.

Do you need to make adjustments? Yes. I cut a front slit to make the dress into a tunic style. My next version of the dress will probably be a size or two smaller on the dress portion with a size 46 sleeve. I am also thinking of adding a sash to make it more fitted on top.

Pattern Level: Experienced Novice/Intermediate. This pattern has set-in sleeves. My mother used to warn me about sleeves saying they are hard to make. Actually set in sleeves are not that bad, but you need to practice. I suggest making a bodice muslin and practicing the gathering, lining up, pining and sewing of the sleeve. I think the hardest part is the gathering and pining followed by the sewing. I don't like lumps in my sleeves and the only way get better at eliminating these lumps is practice. I know there are a lot of tutorials online that you can watch, but the best way to figure it out is to just do it and practice. I have also warned about the limited instructions for this pattern. I didn't really follow the instructions. I just remembered the steps from making my other dresses and followed that order.

What could I have done better? Read above.

Would you sew this pattern again? Yes, I would. And I will choose a better fabric for the dress.

NOTE: Don't give up if your final product ends up looking unwearable. It can always be redeemed or remade. Just ask for help. Sometimes when you're emotional (like me) you fail to see outside the box since you're so close to the project. Sometimes someone else's perspective can give you inspiration. Like my mom's suggestion. Okay enough. Now I sound like a bad after school special.

Pattern: Wedding Dress pattern from Burdastyle Magazine.
Fabric: Fruit patterned black cotton twill with lycra from Fabric.com.
Techniques: Facings, darts and set in sleeves.