Tuesday, September 4, 2012
I've moved.
Sorry for disappearing for awhile. I haven't stopped sewing or anything like that. I've gotten lazy keeping up this blog and have been posting my new sewing projects over at my main blog: Apple Buni. So if you are still interested in what I've been up to than come over and take a peek. Just click on the sewing category and you'll see all my sewing posts. I'll be seeing you there.
Tuesday, July 10, 2012
Kawaii Fabric Delivery
I love getting kawaii wrapped packages. Look at the cute Washi tape! *high pitched squeal** Especially when that package contains kawaii Japanese fabric. I just received some fabric from Staci at A Vintage Fairytale on Etsy. I made my purchase on Thursday and received it on Monday. Superfast and beautifully wrapped. I even received some cute little extras. See the upper right box.
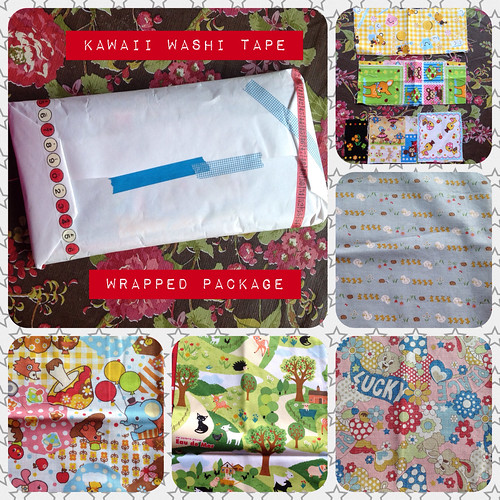
Thank you so much Staci. I love all my items. I can't wait to get started and sew something.
And if you're wondering about the other pictures I promised? Well, I just finished another dress over the weekend, but made the stupid mistake of trying to line a stretch rayon with a slippery acetate. A slippery knit material with a slippery woven material. These things don't mix. They don't hang right. They just don't look good together. Sometimes I really think I should just stop sewing clothes altogether. I never seem to learn. I will display my shame soon. I promise. For real this time.
Hope your sewing endeavours are better than mine.
xoxo
The Experienced Novice
Friday, June 29, 2012
Hello Kitty meets Liberty of London
Has anyone seen this yet?? Liberty of London has collaborated with Hello Kitty and created some limited edition prints from their famous tana lawn. Aaaaahhh. I am just drooling over this. I found these beauties over at Fabric.com. Why must you torment me while I am still on my fabric diet!
Can you just picture all the cute things you can make from these fabrics.


 |
| Photo from Fabric.com. |
Has anyone seen this yet?? Liberty of London has collaborated with Hello Kitty and created some limited edition prints from their famous tana lawn. Aaaaahhh. I am just drooling over this. I found these beauties over at Fabric.com. Why must you torment me while I am still on my fabric diet!
 |
| My personal favorite. |

I see bags, scarves, skirts and so much more. My mind is just reeling with ideas. I have to take a deep breath, step back and put down the credit card. These fabric pieces aren't cheap. Especially when they are being sold at $32/yard. I will need to save and plan my projects accordingly.

Please let me know if you have made anything from these fabrics because I am dying to know how to look like once they're made into something. *sigh* Now I'm off to dream about future Hello Kitty fabric projects. Happy sewing everyone.
Thursday, June 28, 2012
Paradise Kiss the Movie
Again I have been missing action. Alas, I've been busy doing so many things that I will hopefully post about real soon. First, I need to talk about something I have just heard about. Paradise Kiss (the Manga) has been released as a movie in Japan. AAAAAAaaahhhh!!! I can't believe it. My blog was originally named after Paradise Kiss and I even named my dressform Yukari (the heroine of the manga).
If you don't know what I'm talking about than go here. I found the trailer for the movie on Youtube and posted it below for your viewing pleasure.
And if you're wondering what any of this has to do with sewing. I'll state that reading this manga had rekindled my interest in sewing clothes back when it first came out in English 2001-2002. I was still living in San Jose at the time and had no access to a sewing machine, but I swore I would sew my own clothes one day. Okay, enough gushing. I swear I will go back to my sewing posts. I already finished a Lolita inspired skirt and a top. Just need to take pictures. Happy sewing everyone.
Saturday, June 2, 2012
Sakura Top & Beach Bags
A had little bit of rayon fabric leftover from my Simplicity 7500 dress and realized that it was just the right size for a pillow case tunic. I used the dimensions for a pillow case top using the tutorial from the blog A Beautiful Mess. I added red straps using some red jersey fabric I had lying around. Unfortunately, my photographer was too busy to take a picture of me wearing it so Yukari (my dummy) will model it for me.
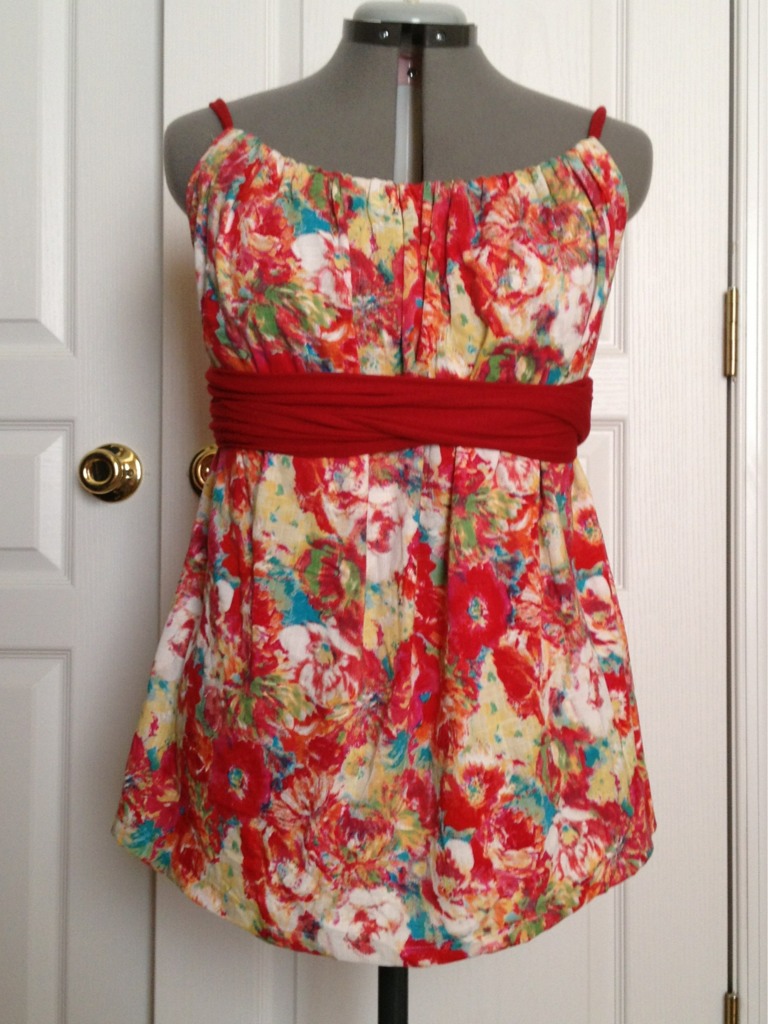
I was really pleased with how easy this top came together. I think its because I used my serger for most of the seams. No need to worry about fraying like the first time I used this fabric.
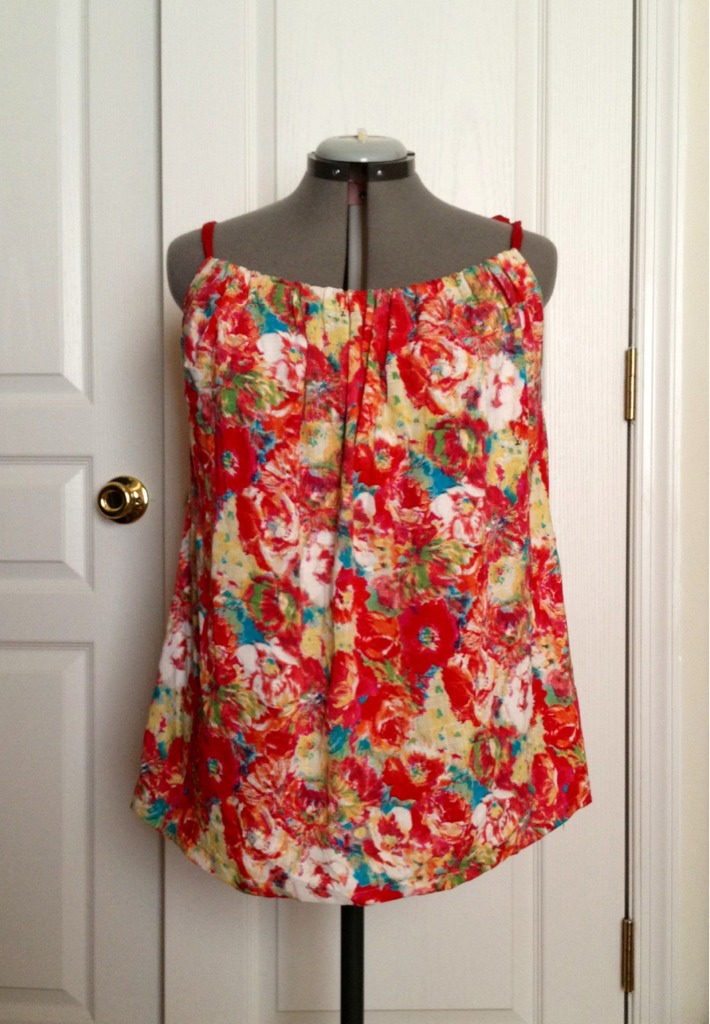
And because pillow case tops are very shapeless, which isn't very flattering on me. I decided that I needed some type of sash or belt for it. I remembered admiring some American Apparel scarves (see below) that can also double as a sash.

So I made one myself using the same jersey fabric that was I used for my straps. My scarf ended up a little bit skinnier than the American Apparel versions, but I still like it. Reminds me of the "spring" scarves that I used to see people wear.
I am so in love with it and how easy it was to make. I didn't use any pattern or tutorial. Just cut out two 6" x 2 yard lengths of jersey or any super stretchy material. Pin fabric pieces right sides together and serge (1/2 inch seam) all the way around leaving room at one end to turn the fabric right side out. Sew your opening closed, iron if you want to and sit back and admire your work. I might even make a tutorial with pictures if anyone is interested. I'm planning on making more scarves using some leftover knit fabric.

You can't really tell since the fabric is so busy, but I sewed my first pocket and even added a little bit something if you look closely. Do you see it?

How about now? A little Apple-Buni tag. Back to some more sewing. Happy weekend everyone.

I am so in love with it and how easy it was to make. I didn't use any pattern or tutorial. Just cut out two 6" x 2 yard lengths of jersey or any super stretchy material. Pin fabric pieces right sides together and serge (1/2 inch seam) all the way around leaving room at one end to turn the fabric right side out. Sew your opening closed, iron if you want to and sit back and admire your work. I might even make a tutorial with pictures if anyone is interested. I'm planning on making more scarves using some leftover knit fabric.
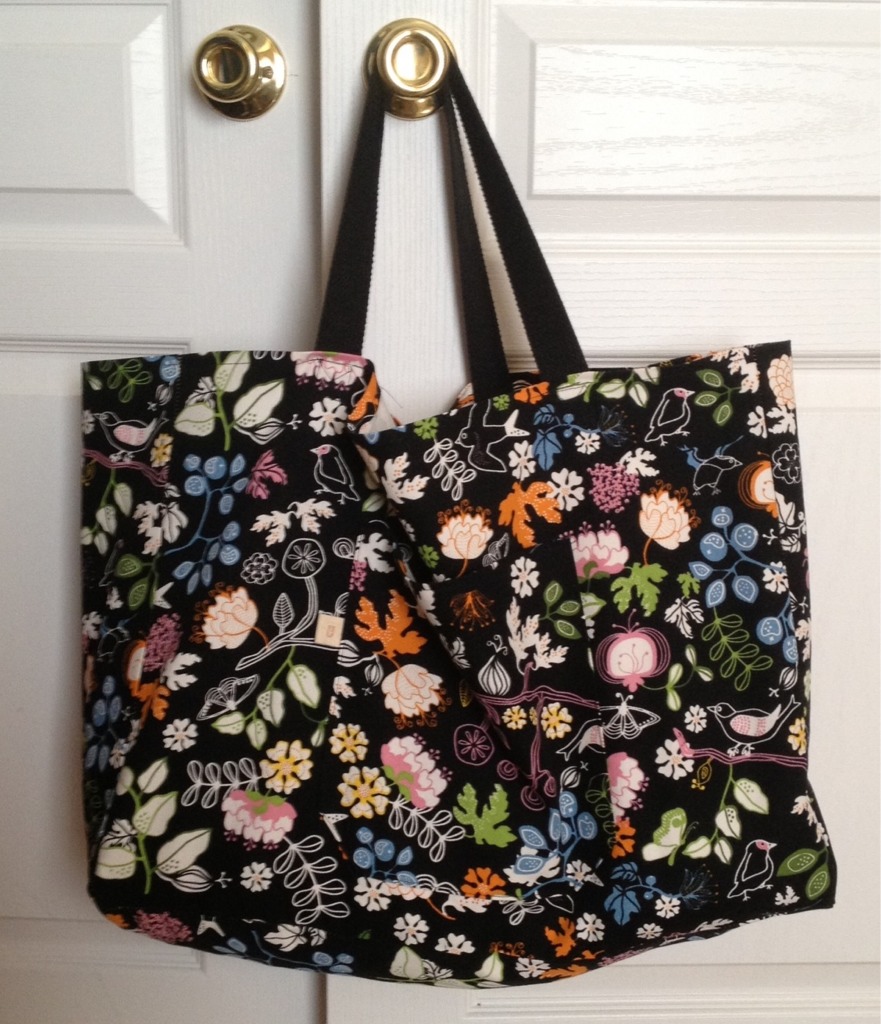
I was also in a bag making mood after I was finished with my top so I made myself a canvas beach bag using some IKEA fabric that my baby brother picked up for me two years ago. I used the tutorial from Elle Apparel. I love how the bag turned out. The bag has lots of room and the picture below has two towels and lots of swim suits. I might make some small bags to hold mine and Buni's swimsuits and maybe a bag for dirty clothes.
Tuesday, May 29, 2012
Crayon Roll
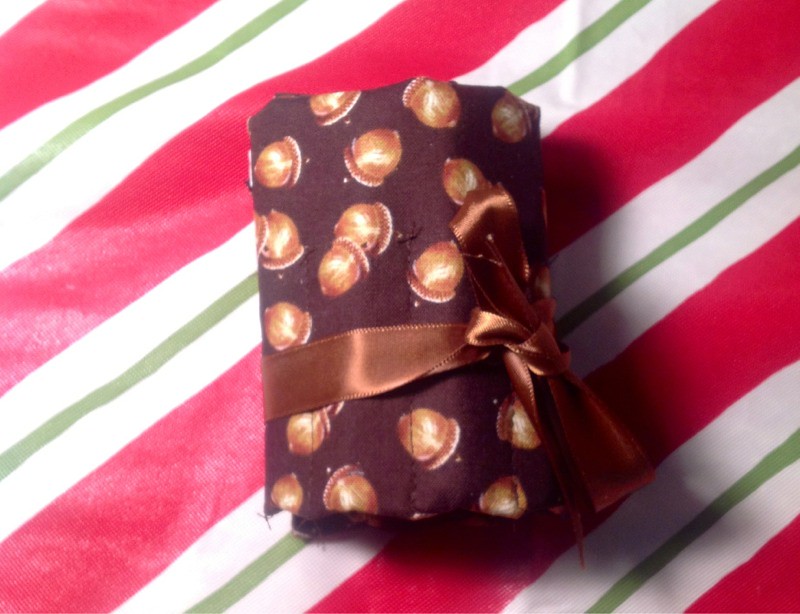
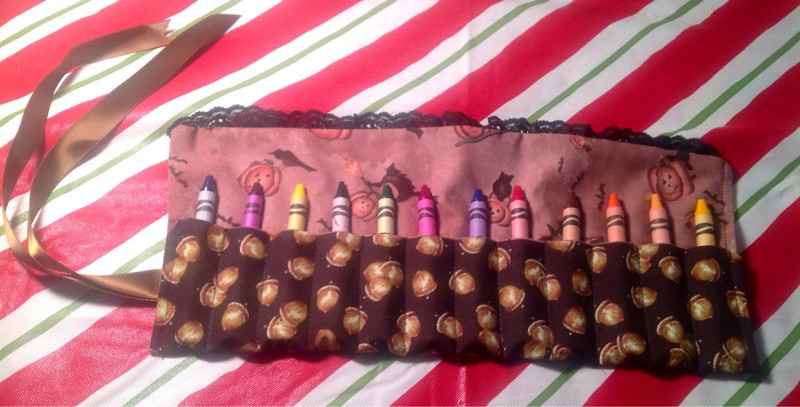
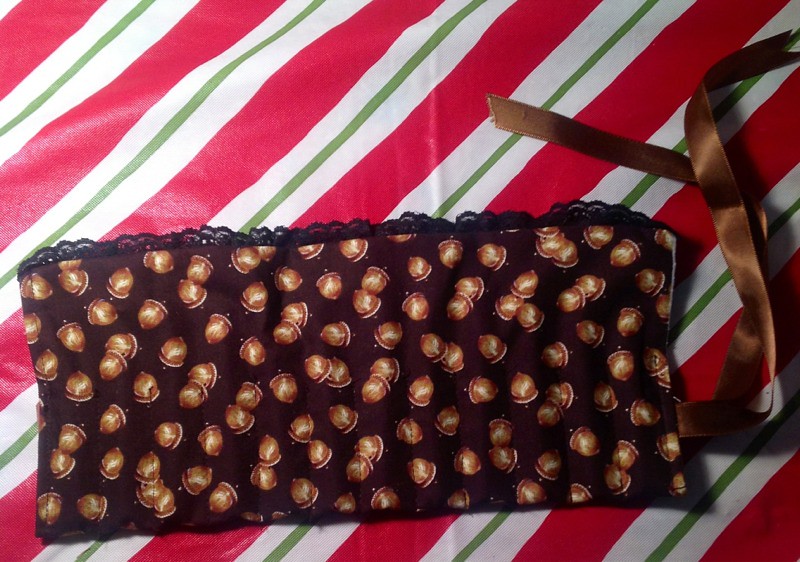
I've been wanting to make one of these crayon rolls ever since I first saw them on the web 2 years ago. Now that my daughter Buni is really into drawing I thought this would be perfect thing to make for her so she can color when we are out and about.
The web is chock full of tutorials on how to make crayon rolls. Just GOOGLE crayon roll tutorials and whole bunch of tutorials will pop up. I got the idea to make mine from reading a tutorial on how to make a purse organizer. My crayon roll is 12 inches wide by 5 inches tall and holds twelve crayons. The fabric I used are two fat quarters I got on sale at Joanns. The acorn fabric is an old Michael Miller design.
I didn't take a picture of it, but the top half of the crayon roll folds down to cover the crayons and keep them from falling out.
If you have questions on how I made this than leave me a comment. Happy sewing.
The web is chock full of tutorials on how to make crayon rolls. Just GOOGLE crayon roll tutorials and whole bunch of tutorials will pop up. I got the idea to make mine from reading a tutorial on how to make a purse organizer. My crayon roll is 12 inches wide by 5 inches tall and holds twelve crayons. The fabric I used are two fat quarters I got on sale at Joanns. The acorn fabric is an old Michael Miller design.
 |
| Front View |
 |
| Back View |
Sunday, May 27, 2012
Stitch Diaries & Sewing Feet
During my hiatus I celebrated my birthday by purchasing some (Distinctive brand) sewing feet from Amazon.


 As soon as I got my sewing feet I started to try them out and realized that I needed a way to document the settings that I used on my sewing machine since each foot requires different settings. I also thought it would be useful to have something visual regarding what type of stitching each foot did. Thus my stitch diary was born. My mom told me that they made a similar stitch diary back in High School when she still lived in the Philippines except all the stitches were hand stitched.
 I initially purchased a SMASH book like the one pictured to act as a mini scrap book, but realized that it is also the perfect size for a stitch diary.
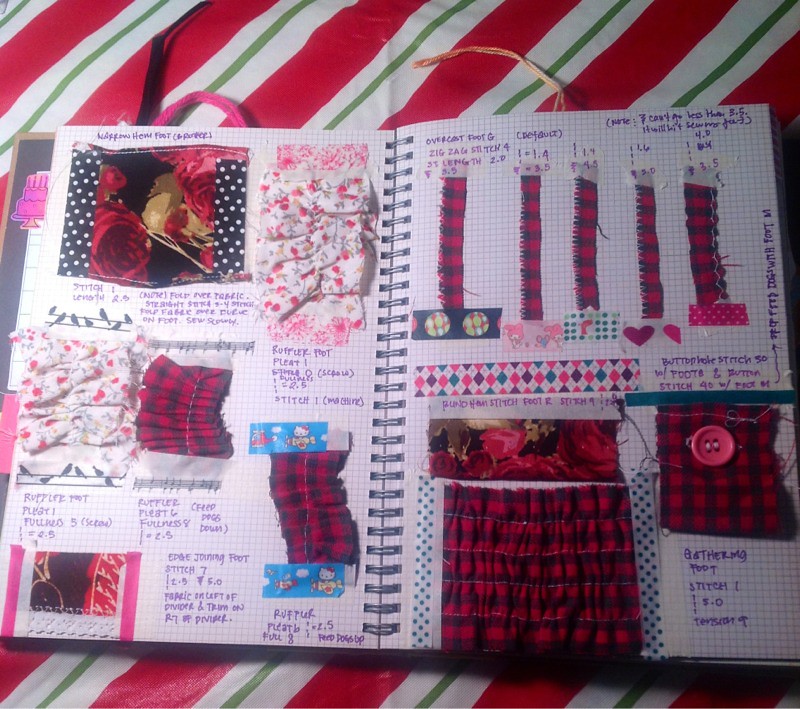
As you can see I sewed on scrap fabric using the various sewing feet I purchased, taped them to my SMASH book with some washi tape and recorded the settings I used.
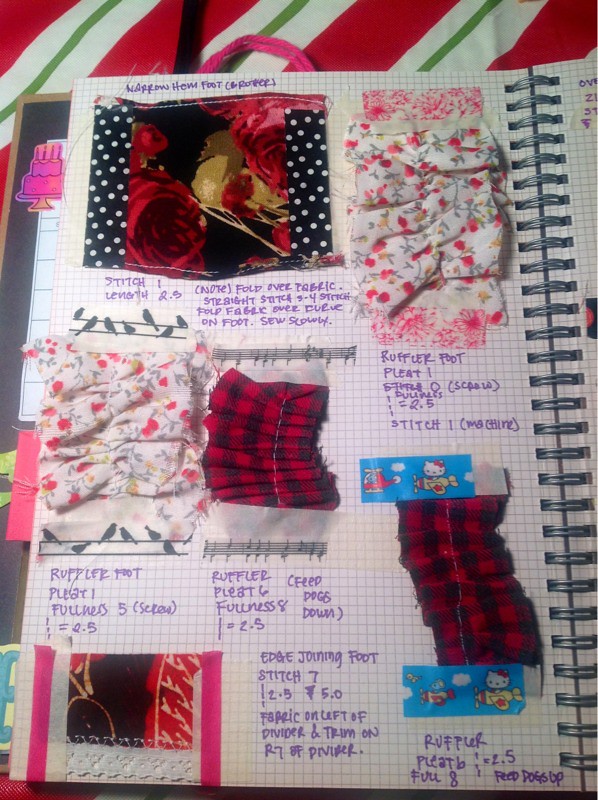
The edge joining foot on bottom left was a personal favorite. I also loved the ruffler, but have yet to try it on a real project. The narrow hem foot on the top left wasn't my favorite since it took forever to figure out how to use it properly and even then the results weren't very good.

Do you see the button and button hole on the right? That was the first time I sewed a button and buttonhole. So easy after I read the instructions for the one step button hole for my sewing machine. I can't believe I was so afraid to use it. Now I need to find the perfect project to use it on.

The side cutter overlock foot on the left was kind of like having a serger foot for your sewing machine. The side cutter overlock foot cut and overlocked at the same time. Also the picot foot was very similar to the overcast foot so I wasn't too impressed with. Still trying to get my head around all the different kinds of feet. I still have to try my bias tape foot and my pintuck foot. Hopefully I'll be adding more entries into my stitch diary real soon.
If you are interested in the sewing feet I used than do a search for "Distinctive Sewing Feet" on Amazon. The prices are very reasonable. The home decorator kit and the kit with various hemming feet were $50 each. The feet are for low shank sewing machine that can snap on and off. The feet worked for my Brother sewing machine so double check before you purchase it. Happy sewing.


 I initially purchased a SMASH book like the one pictured to act as a mini scrap book, but realized that it is also the perfect size for a stitch diary.
 The edge joining foot on bottom left was a personal favorite. I also loved the ruffler, but have yet to try it on a real project. The narrow hem foot on the top left wasn't my favorite since it took forever to figure out how to use it properly and even then the results weren't very good.
Do you see the button and button hole on the right? That was the first time I sewed a button and buttonhole. So easy after I read the instructions for the one step button hole for my sewing machine. I can't believe I was so afraid to use it. Now I need to find the perfect project to use it on.
The side cutter overlock foot on the left was kind of like having a serger foot for your sewing machine. The side cutter overlock foot cut and overlocked at the same time. Also the picot foot was very similar to the overcast foot so I wasn't too impressed with. Still trying to get my head around all the different kinds of feet. I still have to try my bias tape foot and my pintuck foot. Hopefully I'll be adding more entries into my stitch diary real soon.
If you are interested in the sewing feet I used than do a search for "Distinctive Sewing Feet" on Amazon. The prices are very reasonable. The home decorator kit and the kit with various hemming feet were $50 each. The feet are for low shank sewing machine that can snap on and off. The feet worked for my Brother sewing machine so double check before you purchase it. Happy sewing.
Wednesday, May 23, 2012
School Bags and Such
Sorry for my absence. I've been busy, busy, busy with lots of birthdays, first day of schools and being just plain lazy. Luckily I've been sewing for most of my absence with most of my sewing being centered around making things for my little three year old: Buni.

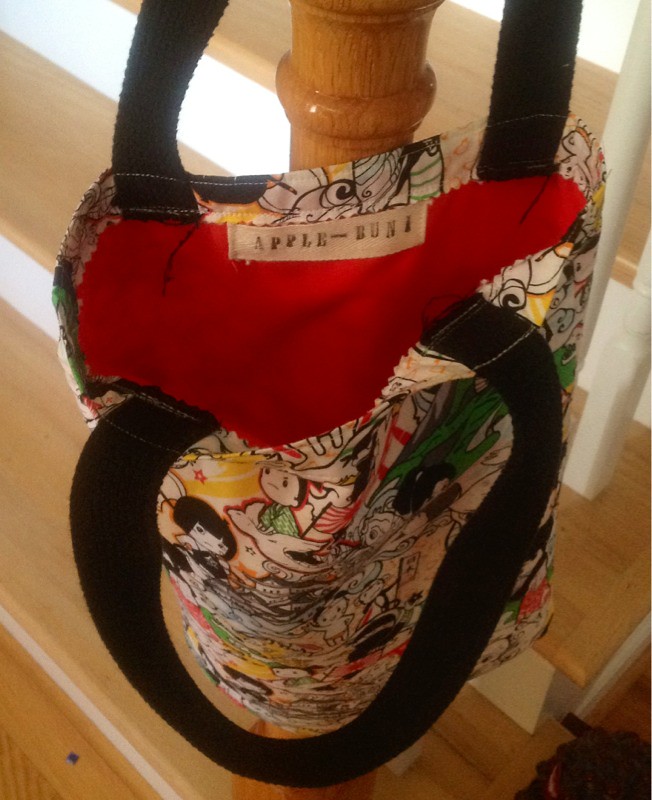
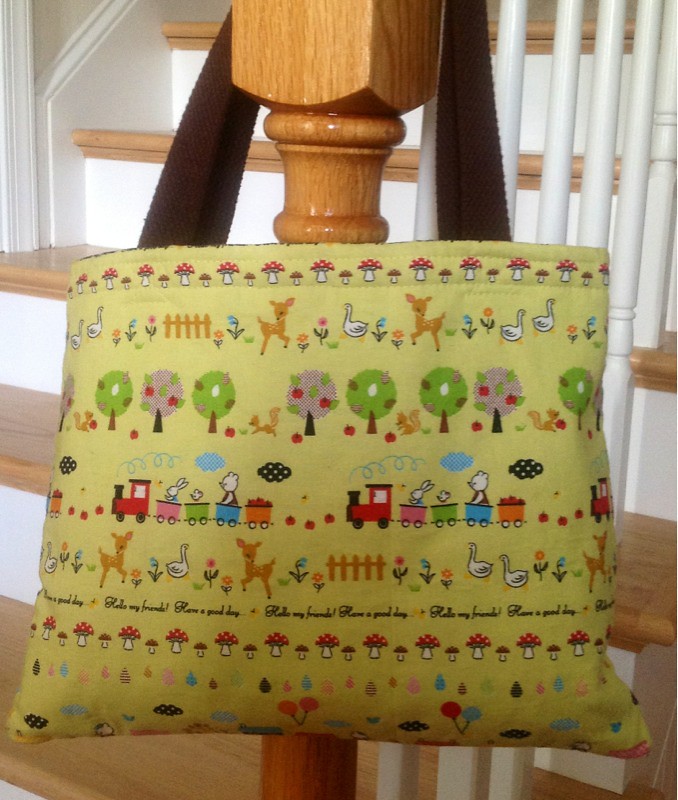
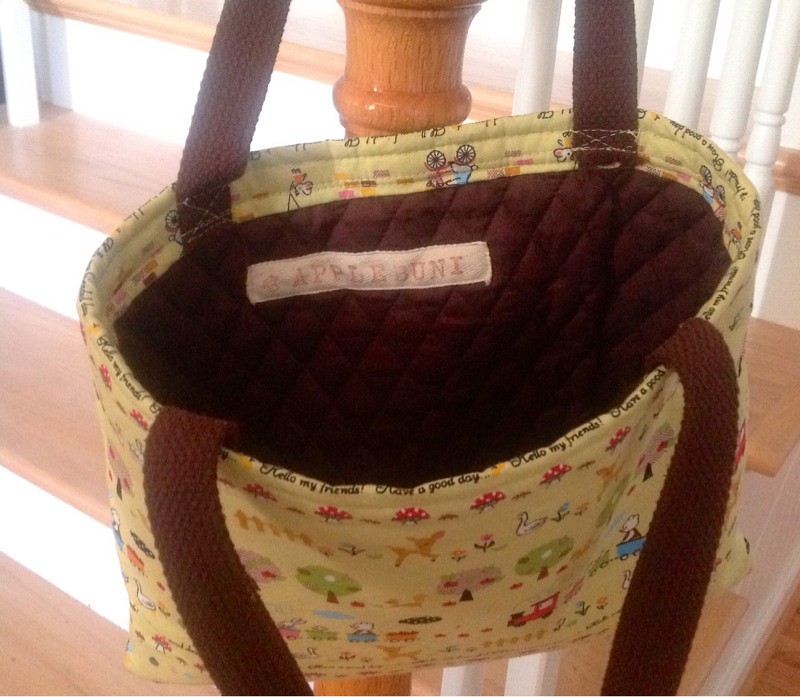
The fabric is called Momotaro and it came from Kawaii Fabric on Etsy. I used red cotton for the lining and black cotton webbing for the straps. You can also see my sad attempt at making labels using twill tape, fabric stamp pad and stamps.
Buni just started pre-school in March and I decided several weeks later that she needed a school bag to bring all her school things: clothes, snacks, art work, etc. Unfortunately, I didn't really measure her while I made the first bag so it ended up too long in both the straps and the bag itself. Lets just say she wears the straps around her neck instead of on her arms. The bag fits me perfectly, but I was thinking about Buni when I was making it. Seriously I was!
The second version of her school bag was smaller and zippered, but ended up too small to fit anything school related. Luckily it fits her Leap Pad perfectly, but I still had to go back to the drawing board to figure out how to make a bag she can use.
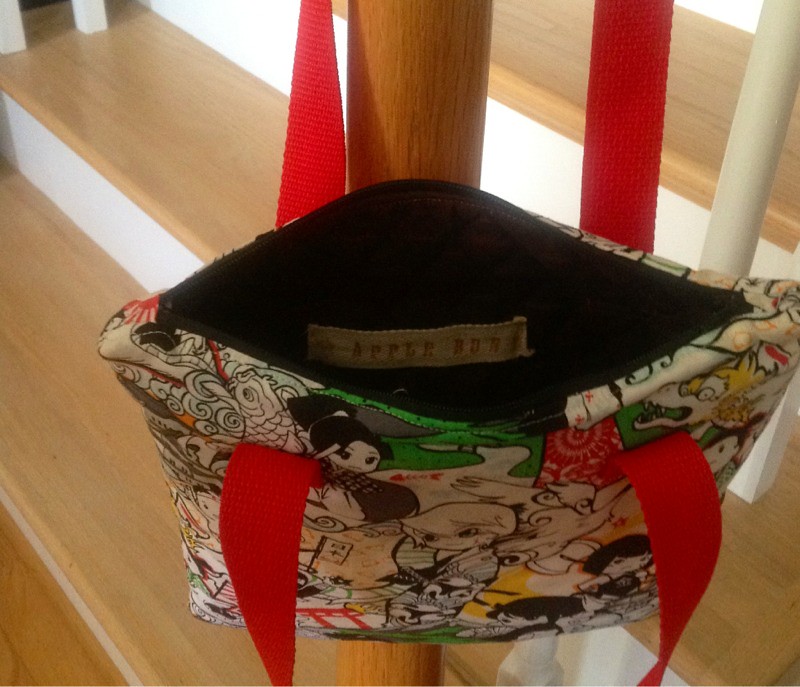
Zippered tote bag version with red polyester webbing for straps. The picture doesn't do a good job of showing my lining, but it's brown pre-quilted fabric from my mom's fabric stash. Don't recommend using pre-quilted fabric for a lining as its really bulky.
Another Apple-Buni tag that I made.
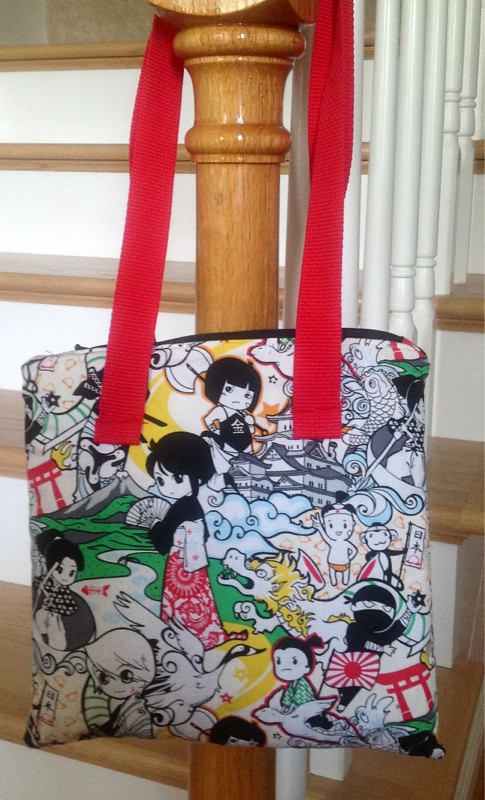
The third version of her bag fit her perfectly. Thank gawd. This will teach me to measure her first before making any future bags. Fabric was a Japanese cotton from Kawaii Fabric and the straps were brown cotton webbing from Joanns.
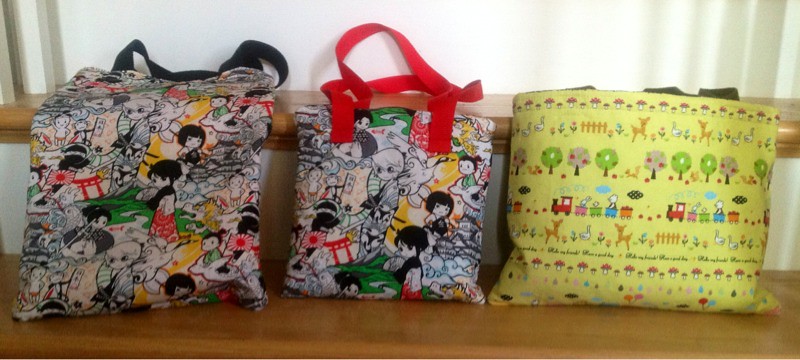
Here's a glimpse of all three bags from Buni's Spring pre-school bag collection. I'm sure I'll be making more bags this coming fall semester.
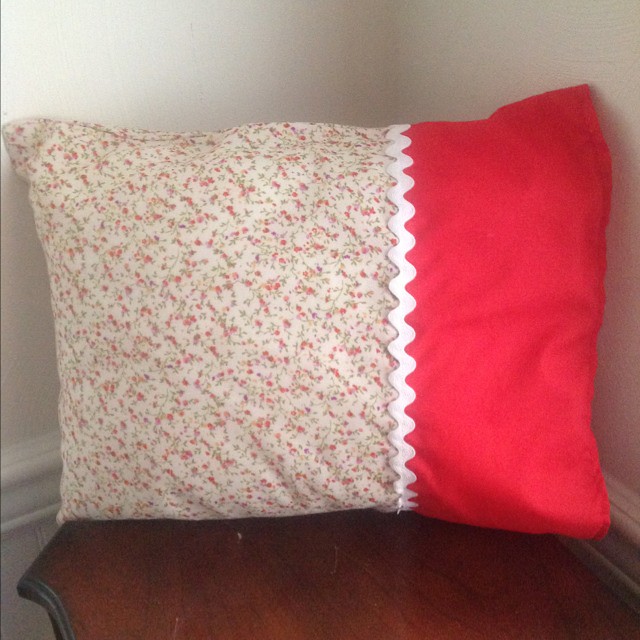
Another little project I had finished recently for her was a pillow case cover for a small pillow that I bought from Joann's over a year ago. Yeah I know. I am a major procrastinator. I am trying harder to not let projects sit there. I kind of winged it when I made the pillow case cover. Measuring the length, width and adding an inch to each measurement. Than I decided that the pattern was too busy so I added a solid color panel and some ric rac. I'm just glad that in the end that the pillowcase fit. Floral fabric and red fabric were both from Fabric Mart and vintage jumbo white ric rac was from eBay.
Stay tuned for more past projects and hopefully some present projects.
The fabric is called Momotaro and it came from Kawaii Fabric on Etsy. I used red cotton for the lining and black cotton webbing for the straps. You can also see my sad attempt at making labels using twill tape, fabric stamp pad and stamps.
Buni just started pre-school in March and I decided several weeks later that she needed a school bag to bring all her school things: clothes, snacks, art work, etc. Unfortunately, I didn't really measure her while I made the first bag so it ended up too long in both the straps and the bag itself. Lets just say she wears the straps around her neck instead of on her arms. The bag fits me perfectly, but I was thinking about Buni when I was making it. Seriously I was!
The second version of her school bag was smaller and zippered, but ended up too small to fit anything school related. Luckily it fits her Leap Pad perfectly, but I still had to go back to the drawing board to figure out how to make a bag she can use.
Zippered tote bag version with red polyester webbing for straps. The picture doesn't do a good job of showing my lining, but it's brown pre-quilted fabric from my mom's fabric stash. Don't recommend using pre-quilted fabric for a lining as its really bulky.
Another Apple-Buni tag that I made.
The third version of her bag fit her perfectly. Thank gawd. This will teach me to measure her first before making any future bags. Fabric was a Japanese cotton from Kawaii Fabric and the straps were brown cotton webbing from Joanns.
Here's a glimpse of all three bags from Buni's Spring pre-school bag collection. I'm sure I'll be making more bags this coming fall semester.
Another little project I had finished recently for her was a pillow case cover for a small pillow that I bought from Joann's over a year ago. Yeah I know. I am a major procrastinator. I am trying harder to not let projects sit there. I kind of winged it when I made the pillow case cover. Measuring the length, width and adding an inch to each measurement. Than I decided that the pattern was too busy so I added a solid color panel and some ric rac. I'm just glad that in the end that the pillowcase fit. Floral fabric and red fabric were both from Fabric Mart and vintage jumbo white ric rac was from eBay.
Stay tuned for more past projects and hopefully some present projects.
Tuesday, March 6, 2012
Clothing Designer Alert: Shabby Apple Mad Hatter Collection 2012
As you know I love anything to do with Alice in Wonderland. I am especially tickled when designers use my favorite novel to design their collections. Have you heard of Shabby Apple? Shabby Apple is an online boutique that sells that loveliest vintage inspired clothes. I haven't heard about them until recently when I came across their Mad Hatter Collection.
Below are some of my favorite looks from their Mad Hatter Collection.
Lovely. I wish I can afford them all. All the dresses in the collection are so inspiring. Perhaps some day I can make something just as lovely. Have a frabjubalous day everyone.
Below are some of my favorite looks from their Mad Hatter Collection.
 |
| The Red Queen |
 |
| Calooh Callay |
 |
| Alice |
 |
| Jabberwocky |
 |
| Tea Time |
Monday, March 5, 2012
Simplicity 2444: Floral Sweetheart Dress

Behold. My floral sweetheart dress that was made using the bodice from Simplicity 2444. I wanted to make sure the bodice fit perfectly before I actually cut into my real fabric so I made a wearable muslin using some leftover floral fabric that came from a disastrous 2nd attempt at Simplicity 7500, which will not be posted about here. Too bad! I don't even want to remember that attempt.


I was lucky enough to have enough fabric from my previous disaster to make the bodice. Sadly I didn't have enough fabric to cut a lining. I ended up finishing the neckline and arm holes using some red bias tape.
 |
| What am I looking at? |
I did manage to also salvage the skirt from my disaster, but it was bit short. Oh well. Make lemonade out lemons right?? I also managed to not match up my piping in the back. Does anyone know how to do that? It always seems off every time I add piping to the waist seam.

Pattern Review (The Pros): Simplicity 2444 is one of those Project Runway inspired patterns, which means it has a lot of options for customization. I decided to work with the bodice first before tackling the full dress, but I wanted to also have something to wear. I cut out the sleeveless bodice, but used a self drafted gathered skirt that I rescued from my Simplicity 7500 2nd attempt. I think a different skirt option would be better since the gathered skirt doesn't really look that good on me. Overall, I love the bodice pattern (with lots of changes) and can't wait to make the full dress version using the bodice and skirt pieces.
The Cons: I don't think its the patterns fault that I have such wacked out body measurements. According to the finished measurements on the back I should be size 14 on top with a size 16 bottom with a size 20 waist. I know I know. Really need to do some crunches or something. Unfortunately I ended with a lot of ease despite the recommendations. Like that hasn't happened before? *Rolls eyes!*
Did it come out like the pattern picture? Yes. At least the bodice portion did although you can't see the dart detail because of the busyness of the floral pattern.
Do you need to make adjustments? Oh yeah. As I mentioned previously because of my supposed sizing according to Simplicity. I cut out a size 14 bodice and graded it (using a french curve) to a 20 waist. I also shortened the width of the four darts in the front bodice and two darts in the back bodice from two inches to one inch and basted the side seams at 1/2 inch. The bodice ended up being enormous on me. What a fool I am. Hahaha! So I ended up resewing all the darts at their original two inch widths for both front and back and sewing the side seams at 7/8 inches and the zipper seam at 5/8 inches and now the bodice fits perfectly. I guess I could grade my bodice to a size 18 or even a 16 waist, but may not since the bodice fits. As long as I remember what I did.
Another adjustment I made was to use store bought red single fold bias tape to finish the neckline and arm holes since I didn't have enough fabric to line it. The seam allowance was 5/8 so I subtracted 1/2 inch (width of my bias tape) from it and ended up with 1/4 inch. The 1/4 inch was what I cut off from the neckline and arm hole openings before I sewed on the bias tape. I read about this technique in one of my books. So far I like how it turned out.
I also basted some red piping at the waist and attached a gathered skirt, which was finished with some matching red double fold bias tape. Last, but not least was a red invisible zipper for the bodice. Phew! lots of adjustments. I hope to use the skirt piece that came with the pattern when I remake this dress.
Pattern Level: Intermediate. At least with all the adjustments I made. I have a feeling that people will have a to do a bit of bodice adjustment to get the fit correct. Plus if you have no experience in lining a dress (raises hand) than I'm sure that will be a learning experience since the pattern instruction doesn't really tell you how to do it while inserting a zipper. I was actually referencing my Colette sewing book, which happens to have instructions and pictures on how to add a lining and a zipper.
What could I have done better? Everything. Hahaha. I also need to figure out how to align my piping. Maybe someone out there can give me tips.
Would you sew this pattern again? Already working on it. Got the fabric ready and will hopefully be cutting into it real soon.
Pattern: Simplicity 2447 purchased from Joanns.
Fabric: Cotton fabric from Fabric Mart.
Would you sew this pattern again? Already working on it. Got the fabric ready and will hopefully be cutting into it real soon.
Pattern: Simplicity 2447 purchased from Joanns.
Fabric: Cotton fabric from Fabric Mart.
Techniques: Darts, bias tape on neckline and armholes, invisible zipper, piping and self drafted gathered skirt.
Saturday, February 25, 2012
Peacock Taffy

Does this fabric look familiar? Of course it is. It is the last bit of Peacock print Rayon Challis that I used on my Juliet dress. I made my first Taffy blouse from those dress remnants. I was lucky to have a lot left over since the blouse was cut on a bias and required some creative positioning, but I managed to fit everything in. I can't wait to wear this top to a birthday party tomorrow.
 |
| Back View |
 |
| Source |
Did it come out like the pattern picture? Yes, it did.
Do you need to make adjustments? Not really. I cut out a size 10 and used some pre made black bias tape because I ran out of fabric to make my own bias tape. Although, I do want to try that out next time. I also used single fold bias tape on the hem instead of folding it over.
Pattern Level: An experienced beginner can breeze through this, but a novice can also work with this pattern.
Would you sew this pattern again? Yes. I would love to make a version that
is tunic length or maybe dress length.
Pattern: Taffy blouse from the Colette Patterns book.
Fabric: Rayon challis from Fabric Mart.
Techniques: Cutting fabric pieces on that bias, bias tape and french seams.
Friday, February 24, 2012
Sewing Room Redux 3
Do you remember when I talked about how I installed cabinets in my second floor room over the garage because I was going to use it as my sewing room? Well, I changed plans during the winter and moved my fabric stash and everything else to our spare room on the third floor because I was tired of having to go from one room to another to gather all my items for sewing. Anyways, after my relocation I decided a month later that it would not work and relocated again to the first floor. All because of this thing.

Yes that is a library card catalog you are looking at. One of those coveted items that one can only wish to find. I was lucky enough to win this one at an online government auction for a steal.

As you can see I replaced the labels with some of my own. The green labels indicate craft type supplies while the hot pink (looks red in the picture) labels store my sewing supplies. Thankfully I only managed to fill up half of this thing. The card catalog is so heavy (despite removing all the drawers) that I was only able to move it to the first floor. My little study is now my new sewing/craft room.

I replaced the books in my bookshelves with my craft and sewing supplies. Reams of scrapbook paper, my cricut, sizzix, boxes of trim and tons of stickers are stored here. Mister is not very happy with this arrangement because he says it looks messy. Guess I can't please everyone. I do plan on cleaning this area up in anticipation of my daughters birthday, but for now I've been sewing up a storm ever since my new move.
For now here is my current work in progress: my first taffy blouse from the Colette sewing book.


Yes that is a library card catalog you are looking at. One of those coveted items that one can only wish to find. I was lucky enough to win this one at an online government auction for a steal.
As you can see I replaced the labels with some of my own. The green labels indicate craft type supplies while the hot pink (looks red in the picture) labels store my sewing supplies. Thankfully I only managed to fill up half of this thing. The card catalog is so heavy (despite removing all the drawers) that I was only able to move it to the first floor. My little study is now my new sewing/craft room.
I replaced the books in my bookshelves with my craft and sewing supplies. Reams of scrapbook paper, my cricut, sizzix, boxes of trim and tons of stickers are stored here. Mister is not very happy with this arrangement because he says it looks messy. Guess I can't please everyone. I do plan on cleaning this area up in anticipation of my daughters birthday, but for now I've been sewing up a storm ever since my new move.
For now here is my current work in progress: my first taffy blouse from the Colette sewing book.
All I need to do is hem the bottom and finish adding some bias tape to the sleeves. I am prepared to cut out and start some more of these this weekend. Stay tuned for my review. Lastly is a picture of another sewing project that I completed last weekend.
I got tired of looking at my plain notebooks that I use at work so I used up some of my scrap fabric and covered them. I even added a lopsided pocket to hold a pen. I will have to raid my scrap stash to make one more cover for my third notebook. Felt like I had to do something to brighten my day at work. Have a great weekend everyone.
Tuesday, February 21, 2012
Juliet in Peacock
I finally got myself together and decided to finish the Babydoll dress (McCalls 4762) that I had cut out last October. I blogged about the first version here.

I called my first version of this dress my Marcia Brady dress and absolutely loved it. My follow up dress is called Juliet in Peacock and its made from another rayon challis with a peacock feather type pattern that I purchased from Fabric Mart last year. Here it is.

Again the construction was very straight forward and easy. The changes I made this time around was to remove the 1/2 inch that I added to the bodice side seams and 1/2 inch from the skirt side seams. I kept the 1/2 inch that I added to the side seams of the sleeves. These changes resulted in a better fitting dress bodice.

I also added black piping to outline the bodice since I didn't want the shape of the dress to get lost in the pattern like it did in my first dress. I finished the sleeves and hem in black double fold bias tape. I love the contrast and the flow of the dress. This dress really reminds me of the dress that Juliet wore in the Romeo and Juliet movie. The one from the 70s not the Leonardo Dicaprio and Claire Danes version.

The dress fabric flows beautifully and I love wearing it. I actually wore this for two days straight. Last night for its debut at Misters cousin's birthday and today at work. I even received a compliment from my supervisor about it.
I love the fabric so much that I used what remained to make a Taffy blouse from the Colette Pattern book I talked about here. Stay tuned for an upcoming post on that.
Subscribe to:
Posts (Atom)